How to Print Photo on Wood with a Laser Engraver? [Ultimate Guide]
Time for a quick(ish) lesson in photo engraving. Sure, anyone can toss an image into their burning software of choice and get a result, maybe even a good result. But it’s very unlikely that it will be a great result. As the saying goes, garbage in, garbage out.
This lesson is to help you get the best result of engraving a photo on wood by using a laser engraver (xTool D1 Pro). For the impatient, see the Quick Version down at the bottom.
In This Article
- What Types of Wood to Engrave on?
- Material Prep Options
- The Photo to Be Engraved on Wood
- The Software to Design Your Engraved Photos
- How to Prepare Your Photo for Laser Engraving
- Laser Settings on LightBurn
- Engraved Photo Finish
- The Quick Photo Engraving on Wood Tutorial
What Types of Wood to Engrave Photo on?
Ideally, your material is flat. If it’s warped, then you need to work out a way to make it flat. I tend to tape thin plywood (1-6mm) around the edges if I have a warped piece, convex side down, which is often with cheap materials.
Different types of wood can have very different characteristics when it comes to engraving/cutting. Even the same type can vary from section to section, sheet to sheet, etc. So, what worked on this bit may be a little off on the next bit. Just expect that and learn to compensate when needed.
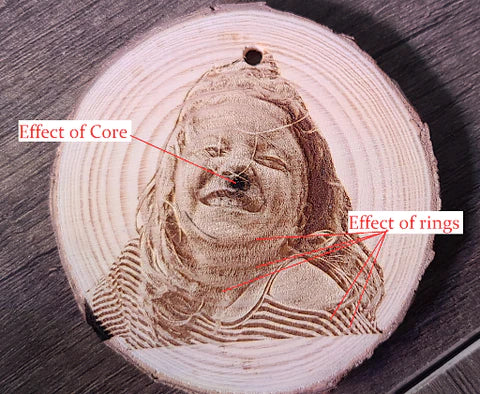
Patterns in the wood will have different burn characteristics. For example, if you’re using unprocessed slices (literally a slice of a tree), rings of different colors will show up in the burn and the core will have an exploded look. Plywood that shifts in color will also show color shifts in the burned image.
Material Prep Options
Before getting started on the image work, take some time to consider what you can do to the material itself to make it more compliant to what you want to do.
1) Sanding
Remember that bit above about being flat? This can help. Some 400-600 grit sandpaper will help smooth out the surface of your material so you can get a more even burn. This is a really good idea if using wood slices, which have probably not been sanded at all.
2) Pre-treatments
There are a few tricks you can do to get the engraving to be extra black from the get-go instead of the usual brown. These also allow for high speed and lower power burns without loss of detail.
3) Baking Soda/Borax treatment
Mix in 1 part of either of these with 10 parts hot water. (Hot water helps dissolve the powder.) When dissolved, brush/spray the material with the solution, giving it a light coat. Not too much, as it can cause warping.
Now let the material sit overnight so that it’s completely dry. (Cheating at this step yields yucky/uneven results.) And that’s it! Give it a whirl and see how it looks compared to the same burn on untreated wood.
4) Change the color of wood
This one is based on an old wood working trick for giving wood an aged appearance, and it will change the color of your material depending on the dilution rate. Most recently, this has been referred to as the “Kenny Hack” which you can find a video about over on YouTube, but I’ll do a quick and dirty version.
Get yourself a glass container with a non-metal lid, throw in a pad of steel wool (non-coated, fine is good), then add vinegar until the pad is covered. Let that sit for a few days, stirring occasionally. The vinegar will have eaten all/most/some of the steel wool (it’s an acid, and that’s what acids do).
Take some of the liquid, mix it with a bit of water, and brush/spray on a light coat. Let that sit overnight so it’s fully dry. Honestly, I haven’t had great results with this, but it may have been because I was impatient, didn’t dilute properly, or some other issue.
The Photo to Be Engraved on Wood
It kind of goes without saying, but the better a photo you start with, the better the result you’re likely to get. Now, just because the photo *looks* good on your screen doesn’t mean that it’s actually good quality.
Often, photos are compressed in such a way that they can look good but lack actual detail. This makes their file size smaller and easier to transport around the internet. For engraving them though, that’s not beneficial.
Blurry photos, tiny photos, photos of photos (yes, really), and the like are going to be difficult to work with. There is only so much that can be done with those, and they still won’t look great.
I’m not going to go down the rabbit hole of various techniques that can be attempted to save/recreate a bad photo, but instead focus on some tools that can take a reasonably decent image and make it laser ready.
The Software to Design Your Engraved Photos
Your main software probably has methods for manipulating a photo and making it laser ready. XCS, LaserGBRL, Lightburn, etc all come with various tools and algorithms like grayscale, Stucki, Dither, Newsprint, etc.
And don’t get me wrong, I’ve seen some really good stuff come from them. But those options are not what we’re going to go over. Instead, we’re going to look at Imag-R, which is a free online multitool for making your image laser ready. Why Imag-R?
Besides being free (unless you want to get rid of the ads or get the offline version), it has a load of nifty tools that aren’t available elsewhere, and it’s all in one place. Wanna remove the background in a photo or make a puzzle? Yeah, they have those tools there too. Oh, and, you can do it all through your phone, tablet, or PC.
How to Prepare Your Photo for Laser Engraving
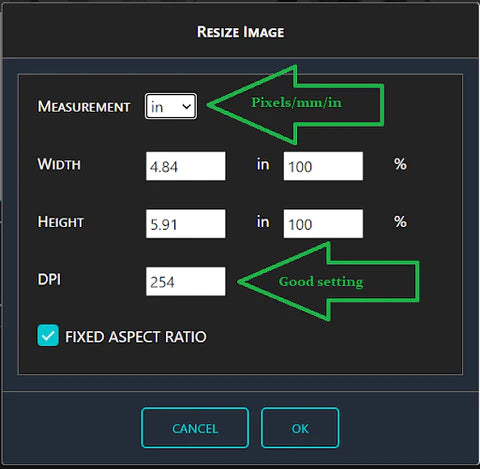
Regardless of what you’re etching on, image preparation is important. Your image should be sized to match your material, DPI set to match what your laser can do (or looks best), and processed so that it’s laser ready.
Even better, processed to match the material. With Imag-R, it’s easy to set the size, DPI, material, etc for an image, and, you get a nice preview of what it should look like. I’ve found that a DPI of 254 looks better than 318 (what the laser is capable of), but your mileage may vary. This equates to 0.1 line interval.
Step 1:
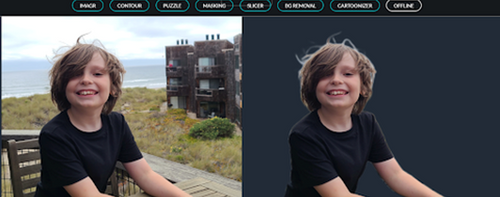
we go to the Imag-R site. Myself, I run any given photo through the background remover tool first, unless there is something special about the background that I want to keep.
Warning, that tool isn’t 100% perfect, but I’d guess that it’s done me right 90% of the time. If I like what I see, I download the resulting image.
Step 2:
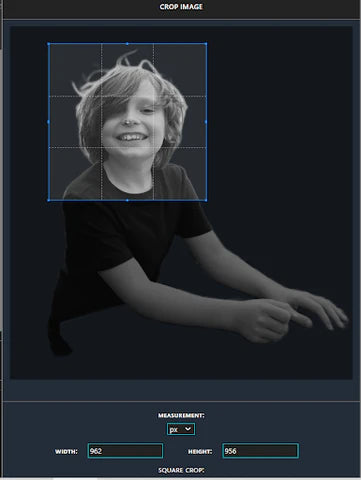
Next, we need to upload our image for processing. That’s either the one you got from the background removal tool, or the raw one if you skipped that step. Once uploaded, crop the image as needed. Resizing will be the next step.
Here, you want to have it change the physical size of the image to match your expectations. For example, if you want an 8x10 engraving, then you need to have the image resized to match that.
Step 3:
While you’re there, bump the DPI up to 254. If you’re feeling spicy, go ahead and change it to 318 and see how you like that. After this process is done, I download the image as a BMP, so that I have a working base, then return to the image on Imag-R.
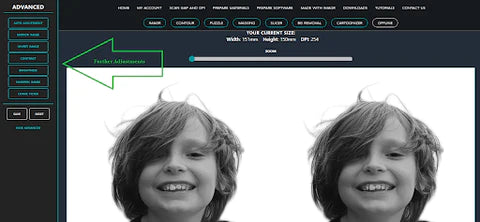
Be sure to check out the other tools there, such as sharpness, contrast adjustments, etc.
Step 4:
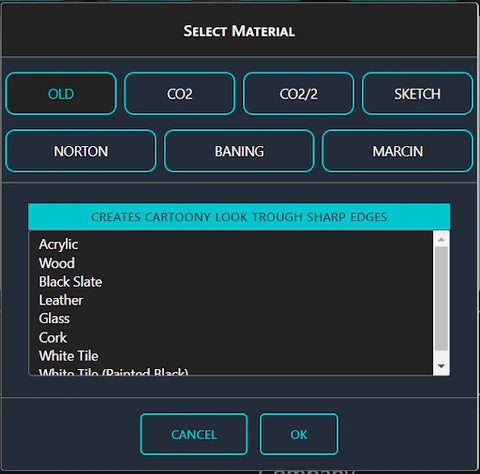
Now on to Wood. Each of the items at the top is an algorithm, and under each of those is a material at the bottom.
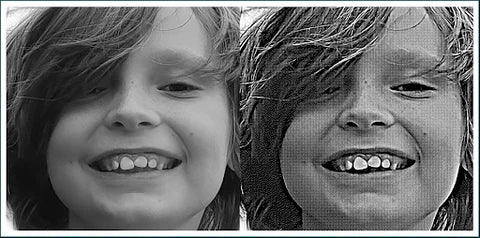
Though some are indicated as being for CO2 machines, feel free to try them out. Myself, Marcin is my goto favorite. Select one, click Ok, and you will get a preview of what the image will look like.
If you zoom in on the preview, you will see how it’s been changed for lasering. Materials like glass and acrylic will automatically be created as a negative, which may or may not be your thing.
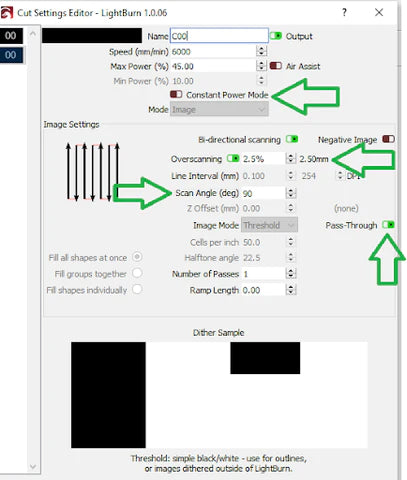
Laser Settings on LightBurn
The rule of thumb is that the grain of your material should be running up/down while your engraving is done left to right, which is called the scan angle in Lightburn.
That usually works well, so orient your material in the engraver that way. Generally speaking, the faster the laser moves, the lighter the engraving will be. Likewise, the greater the power level, the darker/deeper your engraving. There is a balance there, which will vary a bit from machine to machine, material to material.
What I find to be a good starting point for non pretreated wood is 6000mm/m with 40% power for one pass at 0 degree scan angle, then a second pass at a 90 degree with power at 45%. It seems to make some details pop better than making a second pass at the original angle.
How I do this is by creating a second copy of the image, put it on a different layer, then aligning the two images so they are on top of one another. You could simply do one pass, change the settings, and then do the other.
Because we already processed the image on the Imag-R site, you will select to engrave as a Pass-Through.
This means the software, Lightburn specifically, will not do any further processing of the image with its built-in algorithms and will not change the DPI/Line interval (these two are linked, FYI). In addition, turn off Constant Power Mode, ensure Overscanning is at least 2.5% (5% is better), and verify the Scan Angle.
Once you’re all ready, kick off the job and wait.
Start, first, and second pass.
Engraved Photo Finish
One of the nice things about engraving on wood is that you have options to change the result afterwards. Not dark enough? Give it another pass. Too dark? Give it a light sanding with 400 grit or high sandpaper to take off the top layer. (This takes care of scorch marks too!)
Remember to blow off the dust after sanding, so you have a good idea what the result looks like. If you want to seal it up so it stays nice, go easy with some spray clear. Give it a dusting coat first to kind of hold any loose ash/soot in place, let the piece dry, then give it a better coat.
Brushing clear on may work, but there is a chance it will stir up some ash/soot which will then bleed around your image.

Sanded after burning
The Quick Photo Engraving on Wood Tutorial
- Select your wood
- Complete any pretreatment options for the wood
- Remove image background if you like
- Adjust your image to the size of the engraving you want it to be, at a DPI of 254
- Make any further image corrections
- Select algorithm and material
- Export image
- Change settings in Lightburn to match needs
- Engrave and wait
- Apply any post treatments
xTool D1 Pro Diode Laser Engraver

For more questions. Please join our Facebook group to get inspired!

Related Posts
How to Engrave Glass: Top 3 Ways Explained
How to Sub-Surface Laser Engraving Glass Ball?